This feature is designed to make it easy to upload a PDF or image of AP invoices (and credit memos) to the system and then enter the details of the transaction at a later time. This is different from importing the invoice details from Excel or csv because these are invoices where you don’t have an importable electronic format but instead have a physical copy of an invoice or a PDF and someone will enter the invoice details in the system.
A few benefits of using this feature:
- Copies of many documents can be uploaded to the system (even in the same PDF file) and then entered later at a convenient time
- Vendors can send copies of invoices directly to an email address or FTP folder location and they’ll show up to be processed in the system without someone on your side needing to upload the image
- Copies of invoices are easily stored electronically and can be uploaded at the restaurant and immediately viewed and referenced by corporate
Upload Options
The best format to have an invoice in is PDF. Some vendors send invoices electronically so you may already receive an email from a vendor with a PDF copy of the invoice. Others send physical copies of invoices. When physical invoices are received, there are many mobile apps that allow you to take an image with your phone and it will scan it into a PDF immediately. That PDF can then be uploaded to the system.
There are 3 ways to upload copies of invoices for this process:
- Email – you can setup any email address you like and designate it as the email where people can send invoices. You can then send emails to that address with PDF invoices attached and those PDFs will be pulled into the system. You can also instruct vendors to send invoices directly to that address and that cuts out the need for a person in the middle to receive the invoice and forward it on. Steps on setting up this email in the system are further down in this training.
- FTP – Restaurant365 can setup an FTP folder for your company which is a folder you can drop copies of invoices into and the system will automatically check that location and pull them into the system multiple times a day. If you don’t have a Restaurant365 FTP folder setup and would like one, please contact support. Once they alert you that your FTP site is setup, click here for FTP connection steps
- Manual Upload – PDFs and images of documents can also be quickly uploaded from within the system. Simply go to Vendor – Upload File in the top ribbon and then click the Upload File button to browse out to the file on your computer that you want to upload.
After Uploading
When documents are uploaded they show up in the Documents to Process list. This is the list of copies of AP invoices (or credit memos) that the user will use to enter details about that invoice in the system and the invoice copy will automatically be attached to the new invoice. The following steps describe how to work with this list:
- Go to Accounting – Accounts Payable – Documents to Process (or Operations – Purchases – Documents to Process)
- This will show in the center of the screen a thumbnail image of each document that’s been uploaded and not yet entered as an invoice
- Click the Inv button (or CM button if its a credit memo) just above the image of the invoice you are ready to enter (outlined in orange box in image below)
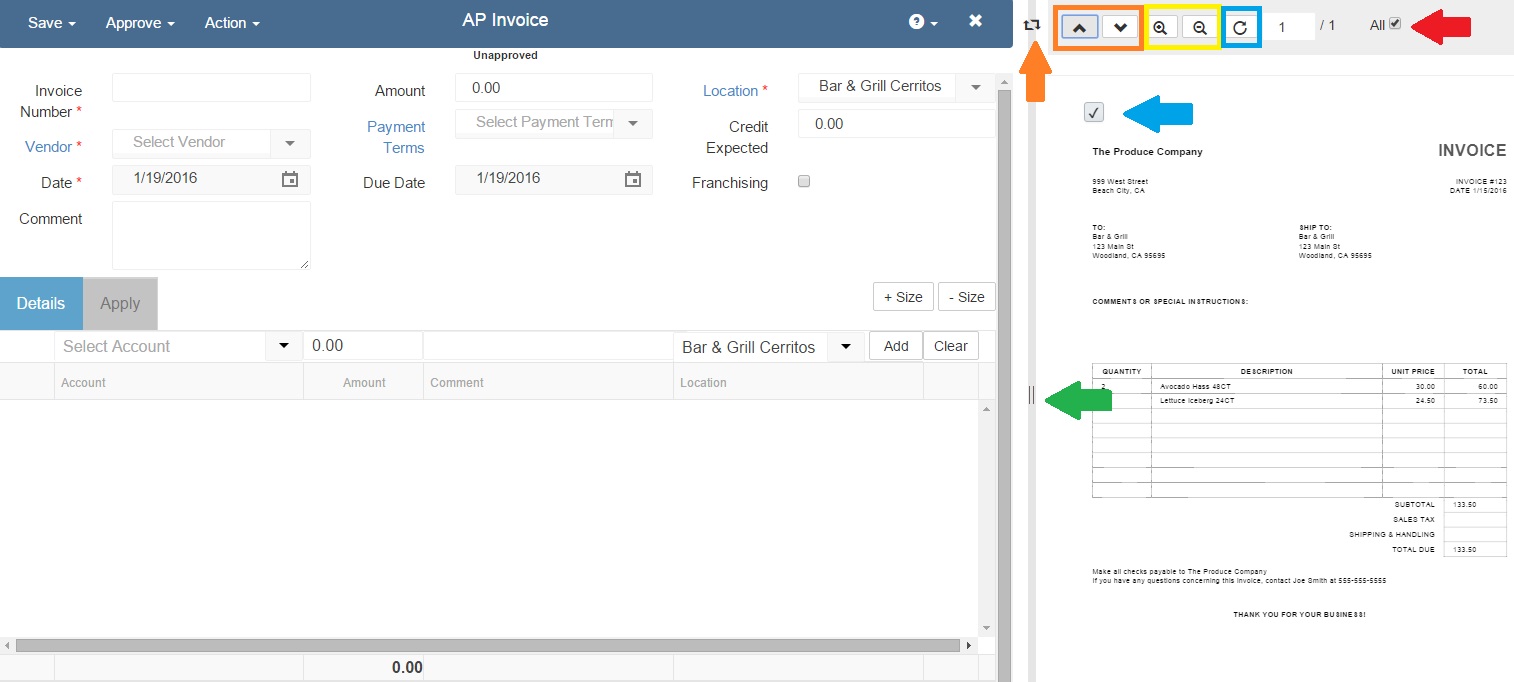
- This will open the regular AP Invoice form on the left and will have the copy of the copy of the invoice showing in the right hand side of the screen (image shown below these steps)
- Enter the details of the invoice in the invoice form and use the buttons in the right hand pane to navigate through the document you uploaded. The buttons are described below:
- Next Page and Previous Page – these will take you through the pages of the uploaded document (highlighted in orange in image below)
- Zoom in and out – these will zoom in or out on the document (highlighted in yellow in image below)
- Rotate – this will rotate the image clockwise by 90 degrees each time clicked (highlighted in blue in image below)
- Select All checkbox – this will select all pages of the document to be attached to this invoice in the system (red arrow in image below)
- Select Current Page checkbox – this will select the current page of the document to be attached to this invoice in the system (blue arrow in image below)
- Swap View – this will swap the screen layout so instead of the document on the right side of the screen it will be on the bottom of the screen. This allows for wider viewing of the document since it can take up the whole screen horizontally instead of vertically (orange arrow in image below)
- View Resize – this can be dragged in or out to make the document take up more or less of the screen (green arrow in image below)
- Choose which pages of the document to attach to this invoice. By default the All checkbox is selected which means all pages will be attached to this invoice, but if you only want specific pages attached, you can uncheck the All button and then check the Select Current Page checkbox on each page that you want included
- Save & Close or Approve & Close the invoice and this document is completed
- Note: Some documents may contain more than 1 invoice. If the All checkbox is selected then the system assumes this document is for 1 invoice and once the invoice is entered thent he document will be removed from the Documents to Process list automatically. If not all pages are included then the system assumes the document contains multiple invoices and it will remain on the Documents to Process list so the user can go back to that list and click the Inv button again and enter another invoice with this document. In this case, once the user feels the document is completely entered, they can click the trash can button above that document from the Documents to Process list (green highlight in image of step 3 above) and it will be removed from the list of unprocessed documents.

Setting Up Email For Invoice Uploading
Setting up the email address that you will use to upload documents is done in the following steps:
- Setup an email address (if you don’t already have one) where invoices will be emailed. This email should only be used for this one purpose because the system will monitor this email address and upload any attachment sent to this address as an invoice copy that needs to be processed. Some examples are invoices@YourRestaurantHere.com or YourRestaurantInvoices@gmail.com or whichever email service you prefer to use.
- Go to Administration – Preferences in the top ribbon and then click on the AP Automation tab of the Preferences form that opens
- Fill in the fields of this form with your email credentials
- The sample image below is for a Gmail address. If your organization uses Gmail, POP forwarding must be enabled for AP Automation to function. To enable POP forwarding, please refer to this Gmail help page: https://support.google.com/mail/answer/13273?rd=1
- Save the preferences form and from now on that address will be monitored and every attachment sent to that address will be uploaded to the system and added to the Documents to Process list
