If you use Quickbooks and are now setting up Restaurant365, moving your vendor list over is easy. Just follow the steps below:
- In Quickbooks go to Reports – List and run the Vendor Contact List report
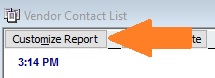
- On this report click the “Customize Report” button in the upper left corner
- In the window that pops up, in the Columns box, select the following columns (and uncheck any others that might be selected). Be sure to choose this exact list of columns, then click OK
- Active Status, Vendor, Phone, Fax, Contact, Bill From 1, Bill From Street 1, Bill From Street 2, Bill From City, Bill From State, Bill From Zip, Print on Check as, Email, Account No., Terms, Tax ID, Eligible for 1099
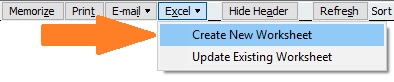
- Now on the report click Excel at the top of the window and choose Create New Worksheet
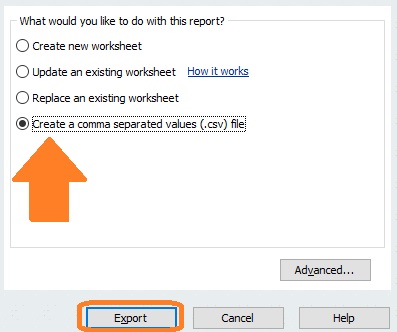
- On the window that pops up select “Create a comma separated values (.csv) file” and then click Export
- In the window that pops up give the file a name and note where you are saving the file
- Now in Restaurant365 you need to be in the Setup Assistant in section Vendors at step Vendor List
- Click Import and browse to the file you exported in step 4 and this will import your vendor list from Quickbooks